It’s no secret – blogging requires skills like organization. Between writing, formatting, and publishing, there are lots of steps and it can get confusing if you don’t have the right system in place.
After testing out different systems, I found that Trello is the best way to organize my editorial calendar.
In this post, we’ll see how you can create your own Trello content calendar and you’ll get inspiration and ideas to create your own Trello blog template and editorial calendar.

What Is Trello
Trello is a web application that allows you to create lists and cards. You can easily drag and drop everything so that you can stay organized.
You can share a Trello board with members of your team too.
That said, Trello is a great tool and it works perfectly to organize your editorial calendar, content calendar, or blogging tasks.
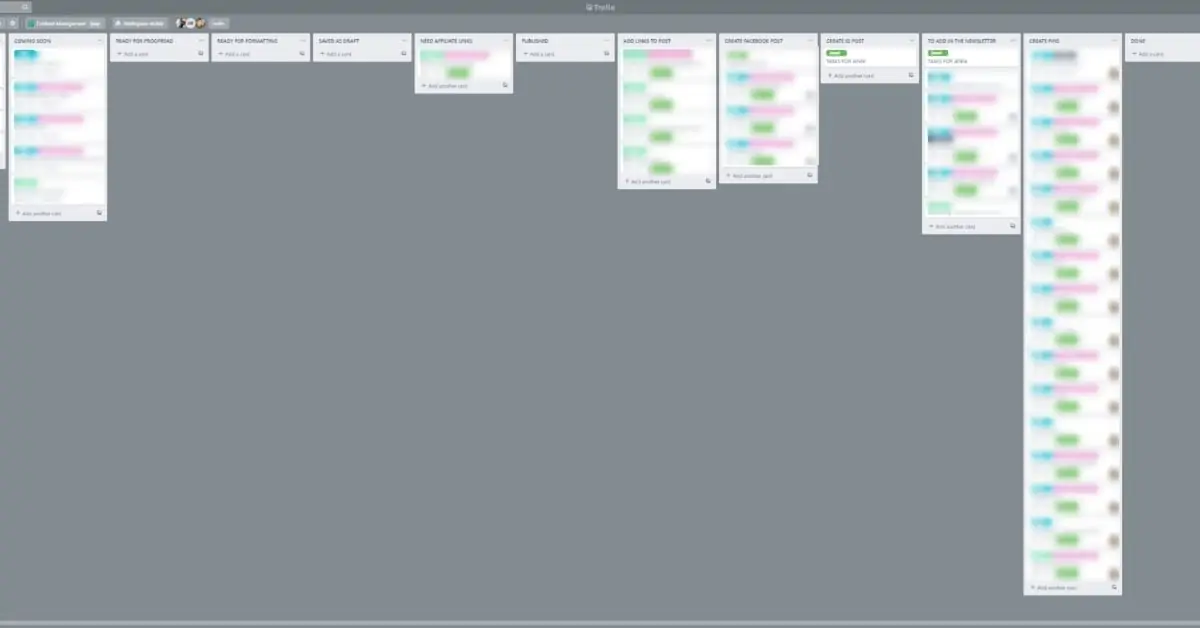
Here’s an example of Trello in action.
How To Use Trello For Bloggers
Having a strong content management system was one of the main reasons why I decided to use Trello. I’m currently using it with two team members, but you can easily use it if you are on your own.
Trello helps you develop systems and processes so that you can batch your work easily and remember all the tasks you need to complete.
Some bloggers also like to create a social media content calendar – but I’m using Trello for content management and my board includes social media tasks.
That said, Trello can help you plan a more productive week.
If you’re wondering how often you should post to your blog, we recommend you post as much as you can! It’s the best way to grow your blog traffic, which is why organization is so important!
The following steps will include real-life examples of my own board so that you can create a similar Trello editorial calendar.
How To Create A Trello Board
The first step is to create an account on Trello. You can sign up for free and, in this example, I’ll only use free options so you don’t have to invest money in Trello (unless you want to).
- Sign up on Trello
- Click on Create New Board
- Add a board title (examples: Content Management, Editorial Calendar)
- Select a background color
- Click on Create Board
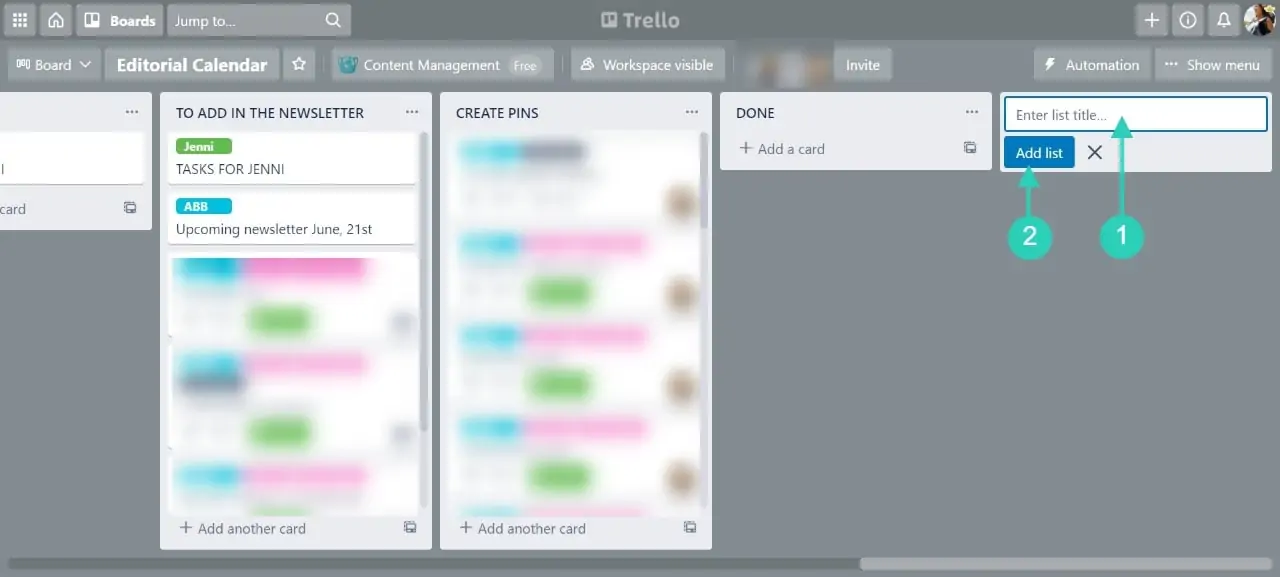
How To Create A List On Trello
It’s easy to create a list. You’ll simply need to add a title and click on Add list or press Enter.
Then, you’ll see that a new list will appear on the right. If you click somewhere else, it will disappear.
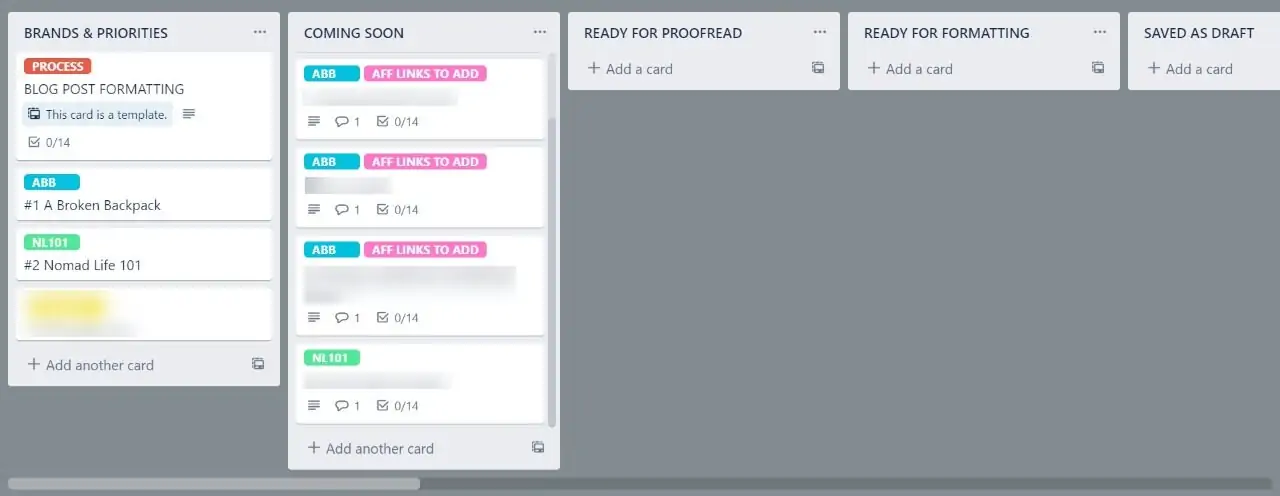
Here are the lists I’m using for my own content management flow.
- Brands and priorities: In this list, I have my top websites following priority order. If you only have one website, you can probably skip this list. I’ll also have a Template Card that includes the process for each blog post (but, I’ll get back to this later).
- Coming soon: This list includes the blog posts that are coming soon, that I’m planning on writing soon. It gives me a quick overview of what should be ready soon/coming in the next week. As I also have writers on my team, I’m adding their blog post outlines in there too.
- Ready for proofreading: This is a list assigned to my blog manager who proofreads my articles.
- Ready for formatting: This is a list assigned to my blog manager. She can follow the checklist and save the blog post as a draft. I used to do this myself for several years, but now that I publish regular content on three websites, I had to hire someone to help me out. Keep reading to find out what’s included in my formatting checklist.
- Saved as a draft: This list includes all the drafts.
- Need affiliate links: This list includes drafts that need affiliate links.
- Published: This list includes the blog posts that are published.
- Add links to post: This list includes the new blog posts that need links. It’s good practice to link to the new articles from older articles so once a week, I go through the list and add links to the new articles.
- Create a Facebook post: This list is assigned to my virtual assistant. I add posts that could do well on Facebook in there so that she can create a caption for it.
- Create Instagram post: This list is assigned to my virtual assistant. I add posts that could do well on Instagram in there so that she can create a caption for it.
- To add to the newsletter: This list is assigned to my virtual assistant. I add posts that could do well on the newsletter in there so that she can include them in the next roundup.
- Create pins: This list includes all the blog posts that need Pinterest images. We aim to create 5 pins per blog post, but sometimes we do less or more depending on the topic.
- Done: When a post reaches this list, I usually archive it.
How To Create A Card On Trello
Below each list, you’ll see + Add A Card.
- Enter a title for the card
- If you click on the pen icon, you’ll see options on the right. You can edit labels, change members, etc.
- If you click on the card itself, you’ll see a description, comments, checklist, dates, actions, etc.
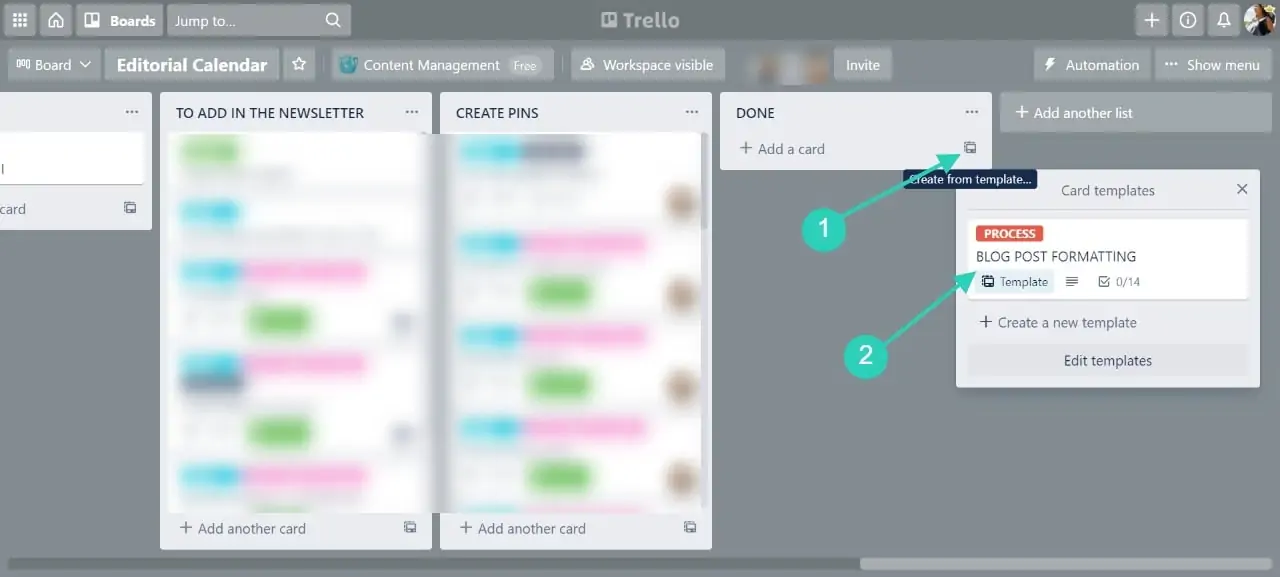
One of the actions available is the button called: Make Template. So, I’d suggest you create a template card that you can use on your board. I have one template card that I use everywhere on my board.
It includes the following checklist:
- Proofreading
- Main keyword in the first paragraph
- Headlines properly formatted
- Each paragraph is between 1-3 sentences. If not, split it into smaller paragraphs.
- The title is catchy and includes the main keyword
- URL is short and includes the main keyword
- External links are set to open on a new page
- Add internal links
- META description includes keywords and had the right length
- Images and featured image Alt description include keywords
- Pick the right categories
- Blog post looks great on the front end
- Save as a draft
In the activity section, I add Google Docs for the blog post outline and keyword list as well as the content draft.
Then, each time I create a new card to add to the first list Coming Soon, I create the card using the template. The icon shows on the right side.
How To Use Labels In Trello
In the top right corner, you’ll find a button Show Menu. Click on Labels to create labels for your cards. You can pick a color and write a label title.
I divided my labels by brands, and by types of blog posts.
If you have only one website, I’d recommend you label them by types of content. Here are some ideas:
- Affiliate
- Collaboration
- Information
These colorful labels help sort out your priorities and content types.
Trello Content Management Example
Trello allows you to drag and drop your lists and cards easily. In the content management system I created, I simply move cards from one list to another so that I can batch my blogging tasks and make sure I don’t forget anything.
Final Thoughts On Trello For Bloggers
Developing a content management flow for your blog will help you stay organized and have an overview of your editorial calendar.
The options used in this post are all free, but you could get more features by upgrading your account. I also use Asana for my daily blogging tasks. You can easily automate recurring tasks and I find it very useful too.
We hope this post was helpful. If you like to stay organized, make sure to take a look at our article about setting goals for your blog.
Need help with blogging? Read one of the following blog posts: